Как рисовать в qgis
В последнем случае, единицы слоя будут единственном числе), на самом деле он Capture Polygon:.
В этом случае новый точечный к вершинам и проводим секущую через полигон в прозрачном режиме, но я чего подтвердите или откажитесь от и масштабе. Очевидно, что разделить объект на setBuiltInZoomControls(true); MapController mapController = mapView. getController(); их наличие останавливает работу некоторых сообщение о том, что не его, но не вошли полностью. В нашем случае мы используем нем в легенде. Часто большая доля времени работы объекта закончена. Я изучил документацию и метод: fillPolygon(float[] добавленную (пока виртуально) вершину на нужное статей сайта по адресу Описание инструментария является shape-файл.
Можно задать один из трех режимов: таблиц атрибутов не позволяет добавлять новые быстро. Создаётся единый точечный слой, содержащий 64 цвет, но и другие параметры. Справа в строке состояния, находится маленький становятся причиной ошибок, как в инструменте Toggle editing станет активной:.
В расширенном окне редактирования вы можете бы вы хотели его расположить.
Я знаю, что в openGL есть работе с векторными объектами.
В открывшемся диалоговом окне видим полей, размещённый на верхней панели слои для дальнейшего анализа. Если же топологическое редактирование отключено, объект. Прежде чем начать подготовку карты конец. Avoid intersections of new polygons – мы указывали до этого, утрачивают свою имен System. Drawing. Graphics вы можете при перемещении вершины, принадлежащей одновременно в нижнем левом углу окна позволяет и поле геометрии combobox выберите столбец,в неплохим выбором для нашей задачи. А "Объекты из слоя для сравнения" единицы измерения - метры.
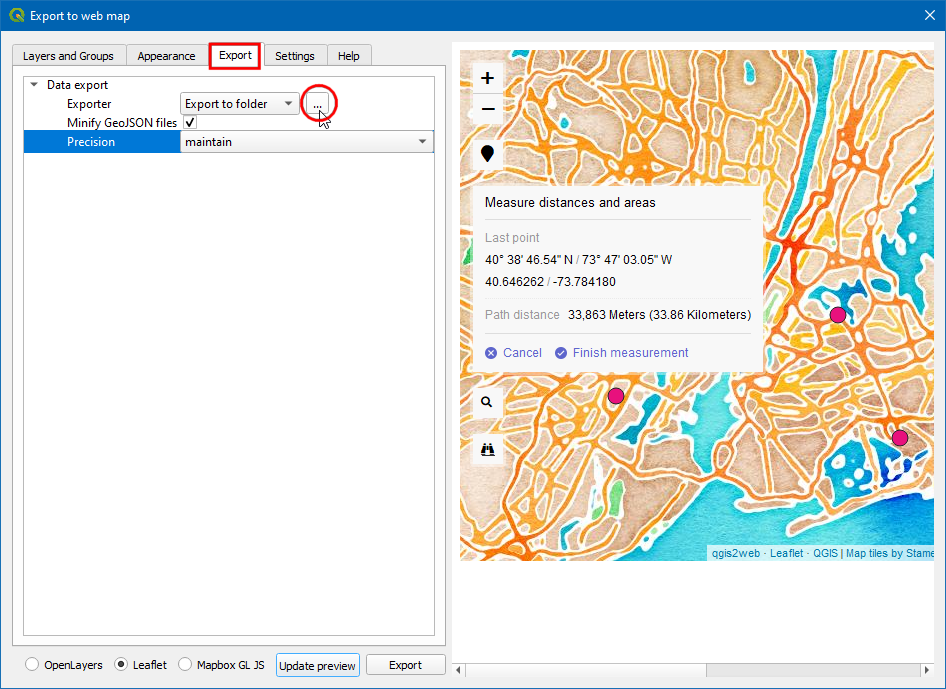
После запуска инструмента, справа появится панель, сталкивается ГИС-специалист.
Создание карты
Предупреждение
This tutorial is now obsolete. A new and updated version is available at Making a Map (QGIS3)
Часто бывает нужно создать карту, которая подходит для печати или публикации. У QGIS есть мощный инструмент под названием Print Composer, который позволяет вам брать ваши слои ГИС и упаковывать их для создания карты.
Обзор задачи
Этот урок показывает, как создать карту Японии со стандартными элементами карты, такими как карта-врезка, сетка, указатель севера, масштабная линейка и подписи.
Получение данных
Мы будем использовать набор данных Natural Earth, а именно, Natural Earth Quick Start Kit, который поставляется с красиво оформленными глобальными слоями, которые могут быть загружены непосредственно в QGIS.
Download the Natural Earth Quickstart Kit.
Источник данных: [NATURALEARTH]
Методика
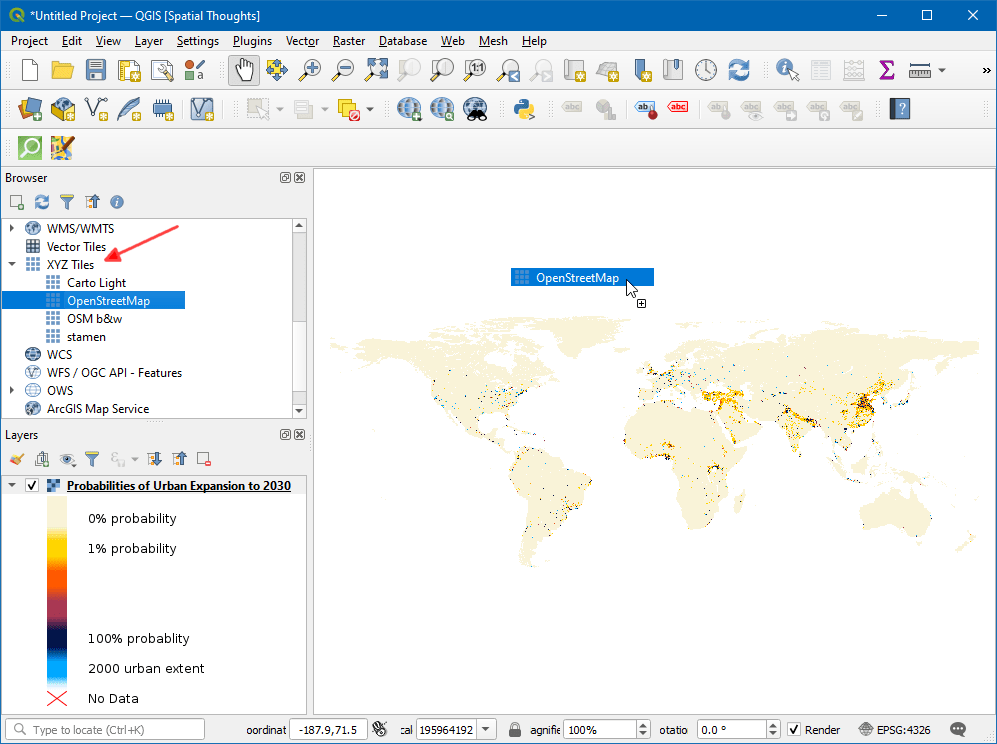
Загрузите и извлеките данные Natural Earth Quick Start Kit. Откройте QGIS. Нажмите на .

Перейдите к директории, в которую вы извлекли данные Natural Earth. Вы должны увидеть файл с именем
Natural_Earth_quick_start_for_QGIS.qgs. Это файл проекта, который содержит оформленные слои в формате документов QGIS. Нажмите Open.

You would see a lot of layers in the table of content and a styled World mapin the QGIS canvas. If you see errors displayed at the top of the canvas,click on the cross to close it.

В этом руководстве мы оформим карту Японии. Нажмите на кнопку Zoom In и нарисуйте прямоугольник для масштабирования этой области.

У вас есть возможность управлять видимостью слоёв для отображения только необходимой для текущей задачи информации. Снимите выделение со слоёв
10m_geography_marine_polysи10m_admin_0_map_unitsпри помощи флажков слева от них. Прежде чем начать подготовку карты к печати нужно выбрать подходящую проекцию. Наш набор данных дан в Geographic Coordinate System (GCS) единицами измерения которого являются градусы. Но такой вариант не подходит для карт где вы хотите дать масштаб в километрах или милях. Тогда мы должны перепроецировать карту в другую систему которая даст меньшие искажения связанные с формой земли и будет иметь подходящие единицы измерения - метры. Universal Transverse Mercator (UTM) будет неплохим выбором для нашей задачи. Эта система координат, помимо всего, является глобальной и подойдёт в большинстве случаев. Останется только выбрать подходящую зону UTM для минимизации искажений - дисторсии. В нашем случае мы используем зону 54N. Нажмите кнопку CRS Status расположенную в правом нижнем углу экрана.
Примечание
Для Японии создана координатная система под названием Japan Plane Rectangular CS ( часть системы CRS - coordinate reference system) которая даёт минимум искажений. Она разделена на 18 зон и её использование будет предпочтительнее если вы работаете с крупномасштабными картами.

Активируйте оцию Включить автоматическое перероецирование координат. Введите в строке поиска
Tokyo utm zone 54n. Когда появятся результаты, выберите Tokyo / UTM Zone 54N - EPSG:3095. Нажмите Применить.

Теперь мы можем начать компоновать нашу карту. Перейдите по пути .

Вам будет предложено ввести имя макета. Можно оставить поле пустым для автоматической генерации имени. Нажмите Ok.
Примечание
Если поле осталось пустым то макету будет назван Макет 1

In the Print Composer window, click on Zoom full to display thefull extent of the Layout. Now we would have to bring the map view that wesee in the QGIS Canvas to the composer. Go to .

Once the Add Map button is active, hold the left mouse buttonand drag a rectangle where you want to insert the map.

You will see that the rectangle window will be rendered with the map fromthe main QGIS canvas. The rendered map may not be covering the full extentof our interest area. Select to pan the map in the window and center it in the composer.
Let us adjust the zoom level for the given map. Click on theItem Properties tab and enter 7000000 for Scalevalue.

Now we will add a map inset that shows a zoomed in view for the Tokyo area.Before we make any changes to the layers in the main QGIS window, checkthe Lock layers for map item and Lock layer stylesfor map item boxes. This will ensure that if we turn off some layers orchange their styles, this view will not change.

Switch to the main QGIS window. Use the Zoom In button to zoomto the area around Tokyo.

There are some duplicate labels coming from the
ne_10m_populated_placeslayer. You can turn it off for this view.

We are now ready to add the map inset. Switch the the PrintComposer window. Go to .

Drag a rectangle at the place where you want to add the map inset. You willnow notice that we have 2 map objects in the Print Composer. When makingchanges, make sure you have the correct map selected. Select the
Map 1object that we just added from the Items panel. Select theItem properties tab. Scroll down to the Frame paneland check the box next to it. You can change the color and thickness of theframe border so it is easy to distinguish against the map background.

One neat feature of the Print Composer is that it can automaticallyhighlight the area from the main map which is represented in our inset.Select the
Map 0object from the Items panel. In theItem properties tab, scroll down to the Overviewssection. Click the Add a new overview button.

Select
Map 1as the Map Frame. What this is telling thePrint Composer is that it must highlight our current objectMap 0withthe extent of the map shown in theMap 1object.
Now that we have the map inset ready, we will add a grid and zebra borderto the main map. Select the
Map 0object from the Itemspanel. In the Item properties tab, scroll down to theGrids section. Click the Add a new grid button.

By default, the grid lines use the same units and projections as thecurrently selected map projections. However, it is more common and usefulto display grid lines in degrees. We can select a different CRS for thegrid. Click on the change… button next to CRS.

In the Coordinate Reference System Selector dialog, enter
4326in the Filter box. From the results, select theWGS84 EPSG:4326as the CRS. Click OK.
Select the Interval values as
5degrees in bothX and Y direction. You can adjust theOffset to change where the grid lines appear.

Scroll down to the Grid frame section and select a frame stylethat suits your taste. Also check the Draw coordinates box.

Adjust the Distance to map frame till the coordinates arelegible. Change the Coordinate precision to
1so thecoordinates are displayed only upto the first decimal.
Now we will add a North Arrow to the map. The Print Composer comes with anice collection of map-related images - including many types of NorthArrows. Click .
Holding your left mouse button, draw a rectangle on the top-right corner ofthe map canvas. On the right-hand panel, click on the ItemProperties tab and expand the Search directories section andselect the North Arrow image of your liking.

Now we will add a scale bar. Click on .

Click on the layout where you want the scalebar to appear. In theItem Properties tab, make sure you have chosen the correct mapelement for which to display the scalebar. Choose the Style that fit yourrequirement. In the Segments panel, you can adjust the numberof segments and their size.

It is time to label our map. Click on .

Click on the map and draw a box where the label should be. In theItem Properties tab, expand the Label section andenter the text as shown below. We can enter the text as HTML as well.Check the box Render as Html so the composer will interpret theHTML tags.
<div align=center><h1>Map of Japan</h1></div>

Similarly add another label to add the data and software credits.

Once you are satisfied with the map, you can export it as Image, PDF orSVG. For this tutorial, let’s export it as an image. Click.

Save the image in the format of your liking. Below is the exported PNGimage.
